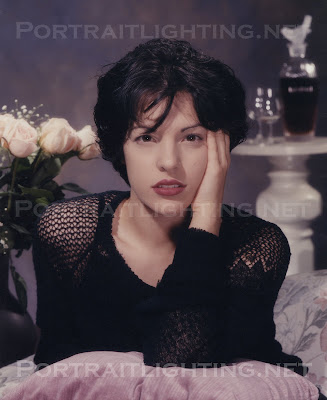
When you are trying to figure out how an image was lighted, eyes can provide useful clues. The front surface of the eye is reflective, so reflections of light sources, also known as catchlights, can usually be seen there. In addition, the eye surface is convex, providing a wide angle of view similar to that of a security mirror. Let's take a look at a few examples.
The above image, scanned from an old print, provides a good example of how smaller light sources are rendered as reflections in the eye. Click on the image to enlarge and examine the eyes. You will see two small white dots in both eyes, each one a specular reflection of a light source. The faint one at 11 o'clock was created by a 7 inch grid-covered strobe, and the one just below the center of the eye by a 16 inch reflector fitted with a diffusion cap. The grid spot was placed above and slightly to the subject's right and pointed downward. That is why its reflection is very high in the eye. The long shadow under the nose is another indicator of the grid spot's high position. The 16 inch strobe, which provided a generous overall fill lighting for the scene, was positioned back just below the camera. In this position, its catchlight is quite small and, as expected, appears just below the eye center. Had it been positioned closer, as for instance as a main light, its reflection would have appeared larger. You can expect other small light sources and larger sources placed far from the subject to create similar catchlights. Keep in mind that this image was lighted with additional sources placed behind the subject, but only the two in front the subject rendered as catchlights.
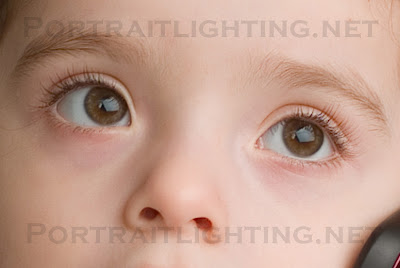
The image above shows the catchlights resulting from a large softbox placed close to the subject. The softbox catchlight rendered as a skewed trapezoid with a translucent quality. If you look closely, you can also see a reflection to the left of softbox catchlight from fill light bounced off the wall behind the camera. Large sources create large catchlights, and the closer the source, the larger the catchlight. The tranlucent quality of these larger reflections results from the distribution of light energy over a large diffuser surface. Reflections from a smaller sources with equivalent output will be commensurately brighter, as the same amount of energy must come from a smaller surface area. The skewed shape of the rectangular-softbox catchlight occurred because the softbox was not square to the subject, but extended from the just right of the subject's left ear back to the camera and was tilted downward slightly. Skewed rectilinear boundaries can tell you a lot about a source's position and inclination.
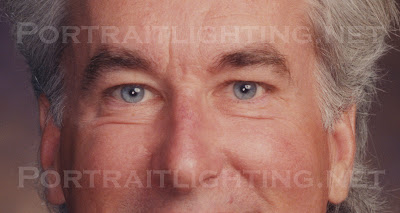
The final image in today's post is a small section scanned from an old executive portrait. You can use catchlights to gain insights into the lighting, but you can also be misled by them. This example demonstrates some of the limitations. Two catchlights per eye are clearly visible in this example. The one at one o'clock is from a 46" umbrella with a diffusion cover and the one near the eye center from a 60" umbrella behind the camera. Two things are clearly demonstrated here: it's hard to determine source size from catchlight size, and it's hard to determine source strength from catchlight intensity. In this image, the catchlight for the 46" umbrella is larger than that of the 60" one, because the 60" umbrella was in an unusually distant position. Also, the 46" umbrella catchlight appears less bright than that of the 60" umbrella, yet the 46" umbrella was delivering about 1.5 f-stops more light to the subject. I think you get the point.
It should be noted that catchlights may be eliminated, modified, or added for artistic reasons. It is still a fairly common practice to retouch out a fill-light catchlight in portraits, so keep that in mind.
In the next post we'll dig a bit deeper into reverse engineering.
Sunday, May 1, 2011
Wednesday, April 20, 2011
We Interrupt Reverse Engineering for a Worthwhile Diversion
I recently received an email from Sean McHugh, author of cambridgeincolour.com, notifying me of new portrait-lighting sections on his site. These new sections feature nifty 3D renderings, and excellent explanations. If you've never visited this site and are, like me, looking for clear explanations of photographic technology, this is something you have to check out. Below I've listed links to the aforementioned sections and to the site home page. Hope you enjoy it.
Portrait Lighting
Fill Lighting
Home Page
I'll post another section on reverse engineering this coming week.
Portrait Lighting
Fill Lighting
Home Page
I'll post another section on reverse engineering this coming week.
Monday, April 11, 2011
Reverse Engineering: Examining the Shadows
I look at shadows, reflections, and lighting contrast when I want to reverse engineer another photographer's lighting. By examining shadows, one can learn a lot about the position, size, and character of the light source. Today I will use a few full-body shots from a recent clothing-line shoot to examine how shadows vary with light source. All of the following images were created in a relatively small room measuring 13' by 18' with an 8' ceiling. Ideally, you would want to shoot these types of images in a much larger space.
The image above was created using a studio flash with the first version of the Paul C. Buff 64" Silver PLM, a large 16 panel silver umbrella that is shaped as a proper paraboloid. The PLM creates a soft but snappy light that I like. It takes well to feathering and was feathered in this example with the light axis forward of our model. A second studio flash was bounced off the white wall behind the camera to produce fill lighting about 1.7 f-stops less intense than that from the PLM. Notice that the shadows thrown to the model's right (our left) are quite soft, but definitely more distinct than those from a softbox of similar surface area. If you click on the photo to get a larger view, you can examine the smaller shadows on the face. Again, these are definitely more distinct than from a large softbox, but much smoother than you'd expect from smaller parabolic or beauty-dish reflectors.
The green-dress-composite image above uses a lighting similar to the prior example, but the PLM was replaced by a studio flash using a standard reflector with a coarse grid and barn doors. The fill light output was increased so that it was only 1.25 f-stops less bright than the grid light. The barn doors where used to block light from falling on the floor or background. This kind of light emphasizes texture and creates very distinct, hard shadows. I generally favor larger sources when doing full-body shots, as I usually find the hard shadows that fall on the floor or surrounding background to be unpleasantly distinct. Click on the image and examine the shadows around the face, and especially those created by the dangling earrings or eyelashes. You can expect small sources, including strobes with their standard reflectors and bare-bulb configurations, to give similarly hard shadows.
The blue-dress shot above was created with a large softbox (100cm X 130cm) oriented horizontally and positioned much like the PLM. In place of a fill light, a large white reflector was placed to our left and somewhat in front of the model. Notice the soft, indistinct and fairly uniform nature of the shadows on the floor beside the model. A bigger softbox would give less distinct shadows and a smaller one correspondingly more defined ones. Satin umbrellas of similar area will give a similar shadow quality, although there will be a slight difference. The umbrella shadows are usually slightly less uniform in the body of the shadow, and the shadow edges slightly more graded.
The final example was lighted with a large beauty dish (24") positioned well above the camera and with a 42" X 42" silver reflector below. This particular beauty dish has a very wide angle of coverage, making it a good choice for pairing with a reflector. The shadows in this example are thrown directly behind the model and are moderately distinct. A smaller dish will provide a tighter shadow with a more distinct edge and a larger source, such as 38" satin umbrella, something a bit softer.
Keep in mind that these examples are just rough points of reference. If you work with different equipment, with different light-to-subject distances, or in a larger space, you will likely get somewhat different results. I'd like to thank Frank for allowing me to use his clothing shots as examples, Lenny for his outstanding makeup, William for his hair wizardry, and Tiffany, our model, for enduring the cold and still delivering a boatload of great poses.
In the next post we'll look at eyes and see how they can be the single-most-important tool for gaining insight into the lighting.
Sunday, April 10, 2011
Reverse Engineering Lighting
OK, I'm back at it. I don't know about you, but when an image catches my eye, I almost always analyze it. I look for clues about lighting, lens settings, post-processing adjustments, etc. In the next few posts I'll describe what I look at to deconstruct lighting. In tomorrow's post we'll use a series of full-body images to illustrate how different lighting sources render shadows.
Thursday, February 10, 2011
A Few Common Reflection Workarounds
Full-length Shots on White
Creating full-length shots on pure white can be problematic. It can be difficult to keep the floor as bright as the vertical portion of the backdrop unless you "wash" the floor with additional lighting either from below or above. This is not always a viable solution. A very effective workaround is to place a smooth, highly reflective sheet below the subject. The floor then acts as a mirror in which the lighted background is reflected. Direct reflection saves the day.
Eyeglasses
Portrait photographers often have to grapple with reflections in eyeglasses. Assuming that you are using a typical portrait-lighting setup with main/fill sources somewhat above face level, you typically have three options: raising the eyeglass arms, raising the offending light source, or repositioning the subject. Raising the eyeglass arms slightly at the ear will cause the eyeglass lenses to tilt downward. A small adjustment may be all you will need, and most viewers will not detect that the earpieces have been raised. Alternately, you may choose to raise your main or fill light sources until the reflection disappears. If adjusting the glasses or moving the lighting fails to solve the problem, consider repositioning the subject. For instance, using broad lighting with a 2/3 facial view, as shown in the image below, the main-light reflection will be directed away from camera view.
On-site Speculars
If you've shot a lot of on-site images with on-camera flash, you've undoubtedly encountered the "ugly blob of light." Reflective surfaces, especially those nearly parallel to the sensor plane can kick back an extremely bright and ugly direct reflection of your flash. To avoid this common problem, you may need to shoot from a different angle or temporarily remove certain reflective objects from the scene. Scan the shooting area for mirrors, reflective clock faces, pictures with and without protective glass, and sundry other reflective items. If you are shooting table shots at a wedding reception, for instance, position yourself so that you are not square to mirrored walls, windows, or glass doors behind the subjects. If you are doing shots in the home, be on the lookout for framed pictures and mirrors. If you are shooting in a business, note the positions of the computer monitors and personal items such as framed pictures and reposition things as needed.
I'm not sure what I'll tackle next, but suggestions are always welcome.
Friday, February 4, 2011
Ideas Anyone?
I'll be putting together another short blog post early this coming week that will cover just a few more uses/consequences of direct reflection. That will wrap up the subject of reflection for now. I'm not quite sure what I'll tackle next, so I'm putting out a call to anyone who has ideas for good subject matter. Please leave any ideas in the comments below or email me at Barry@portraitlighting.net. I will check this particular post periodically to see if any new ideas have come in.
Tuesday, December 21, 2010
Reflection Part 6 (Darker Skin Tones)
If you've attended a few seminars on lighting or portraiture, you've likely heard an audience member ask about exposure for people with dark skin. Invariably, the speaker announces that exposure is exposure and there is no need for compensation. The argument is often supported by an example consisting of an image of several people of differing skin tone. If the exposure is biased for the skin of any one person, an unfavorable skin rendition will result for the others. The argument is irrefutable, but for the inquirer, the answer is often unsatisfying. They want more detail in the photographic rendition of dark skin, something closer to what they see with the naked eye. And, they're not alone. Shortly before digital capture overtook film as the medium of choice, Kodak was marketing a special portrait film for deep-complected skin. If Kodak thought this was an issue, maybe there is something to it.
Dark vs. Light
The subject of skin tone is a very interesting one. It can be approached from both a technical and social angle. In my conversations with people from around the world, I have been surprised by how often darker skin is associated with lower social standing. No doubt, some of this bias is a vestige of Western hegemony. While it would be foolish to assume that a dark-skinned customer will want a lighter rendition of their skin, it can sometimes be an issue. I'm not qualified to talk about the social aspect, so I'll take a stab at the technical.
Diffuse vs. Direct Reflection
In general, the darker the skin, the more it absorbs light and the less it reflects it diffusely. Direct (specular) reflection, however, is dependent primarily on the sheen of the skin surface, and not tone. So, while light and dark skin may produce very similar levels of specular reflection, there will be a big difference in the diffuse reflection. As a result, direct reflections make up a greater proportion of the light reflected from dark-toned skin and the implications of this are many.
Defining Form with Shadow and Highlight
On light skin, the specular highlights ride on top of the glowing skin (diffuse highlight). These specular patches may enhance form, but that are not usually the primary feature that defines form and depth. On light skin, it is the difference in the areas of diffuse highlight and the surrounding shadows that give the face form. With extremely dark skin, shadows and diffuse highlights may be so dark that distinguishing between them becomes difficult. At this extreme, form is rendered by the differences between the specular highlights and the surrounding areas, both shadow and diffuse highlight. Simply, or perhaps over-simply put, with light skin you create form and depth with shadows. With dark skin, you do so with highlights.
Some Celebrities
If you are not quite getting the picture, take a look at some real-world renditions of people with very deep and very fair complexions. One of the best examples of dark African beauty comes in the form of model Alek Wek. A much photographed model, you'll find plenty of images of her on the web. Notice how areas of specular reflection on her cheeks, forehead, nose, and chin often define the form of her face. At the other extreme, take a model with fair skin. Nicole Kidman or Taylor Swift are two examples. Notice how form on these faces is created by shadows around the cheeks, nose, brow, and jaw.
Lighting Strategies for Dark Skin
There is no one right way to light a face, but here are some things you might want to keep in mind when planning your lighting for dark skin. Specular highlights are inevitably more prominent for darker skin. Controlling them is key to achieving the desired result. You'll probably be leaning one of two ways to control specular highlights: minimizing them or making them as large and prominent as possible.
Minimizing specular highlights is not always easy. One approach is to place your lighting, preferably smaller or controllable lights, at oblique angles so that much of the direct reflection is aimed away from camera view. Feathering is another technique that can help, as feathering can decrease both the apparent size and intensity of the source's specular reflection. These techniques were used in the second example from the prior post. By reducing specular reflection, you let the diffuse reflection do more of the talking, and increase tonal richness in the process.
The other approach is to define form by painting the face with large and soft specular highlights. By using very large light sources, you create large specular highlights that can cover the greater part of many facial features. As the light source is large, the energy of the specular highlight will be distributed over a large area, resulting in a pleasant glow. The following picture, as corny as it is, demonstrates the approach. The main light for this image was a large 3' X 4' softbox placed in close.
Subscribe to:
Posts (Atom)